 These gorgeous farmhouse nightstands originally came to be by way of the side of the road! I understand why someone would be parting with them because they were outdated with their dark finish and thick lacquer. But… they were solid wood and I saw the potential for a couple of gorgeous Farmhouse Nightstands under all of those layers of lacquer. Read on to see how they came to be…
Farmhouse Nightstands DIY Process:
Step 1:
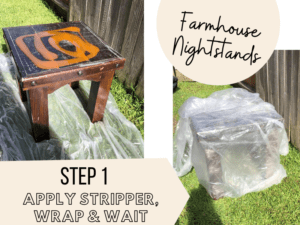 The first step to the transformation to Farmhouse Nightstands, stripping them. You’d think because they are rather small items it wouldn’t be so hard to strip them right? Well, the thick lacquer and HOT Texas summer temps made it a labor of love. A thick layer of Citristrip, spread on with a cheap chip paintbrush, and then wrapped in saran wrap, and then folded in the disposable plastic drop cloth they were sitting on- Step 1: Check!
Step 2:
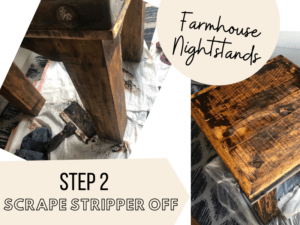
After 24 hours I unwrapped these like a kid on Christmas morning! After anxiously scraping, and scraping, and scraping some more I started to realize it would be hours and lots of elbow grease and sweat before I would be able to see the beautiful raw wood underneath all that dark stain and thick lacquer. Its always worth it in the end, but it was a dirty job. Make sure you have some good thick gloves to work with and a backup trowel if you are taking on a piece like these.. You’ll thank me later.
Step 3:
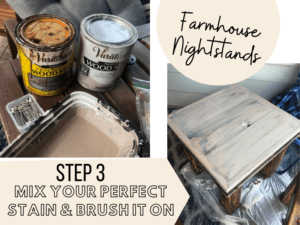
When I got everything scraped off that I could handle (I decided the rustic look with some of the old, dark spots showing through would look good), I wiped them with mineral spirits to get all the stickiness off and then let that dry. This stain is a mixture of Antique White and Special Walnut. I brushed it on thick with a cheap chip paintbrush, let it sit and penetrate for about 10-20 minutes and then wiped it off. You can definitely play around with how much color you want.
Step 4:
I brushed 2 coats of Fusion Matte Tough Coat over them to protect the wood. They will have drinks sitting on (and probably spilling on) them, and will be used and abused, as everything in our tiny home with 5 people is. This finishing coat made them smooth to the touch and ready to use. A little disclaimer- I didn’t set anything on them for a few days to give the tough coat time to cure properly.
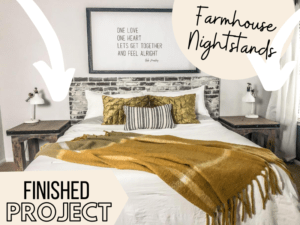
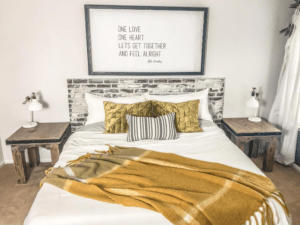
 I love the these Farmhouse Nightstands. They are as useful as they are beautiful. The oversized look simplifies this space because we need nothing else on the wall by our bed. I was planning on trimming the legs down so that the tabletop sits a couple inches below the bed height, and now I’m debating if I still want to. The variation in height from the bed would look great, but they are just so functional I hate to mess with that. FYI- Our bed is just sitting on the boxspring on the floor for this boho look, so your end tables turned nightstands may already sit lower if you have a more traditional-height bed.
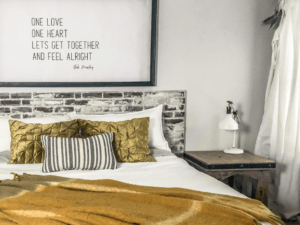
If you are interested in my Brick Headboard you can see the DIY here.
I’m hoping this project inspires you next time you come across some outdated wood furniture. Turn it into a different purpose that’ll serve you & your home. Plus give it a whole new vibe with this restoration process. I’d love to see your transformations & celebrate them with you- be sure to tag me on Facebook or Instagram when you post your pics!!!